

Photoshop AI tools are most useful when an image is already close to finished. They can clean up a product background, remove an unwanted passer-by, or add space around a tight crop. Instead of replacing traditional editing, these features let you select, remove, extend, generate, and refine specific parts of an image while keeping the rest of the project editable.
Start with the editing problem, not the AI feature
The easiest way to use Photoshop AI is to define the visual problem before opening a menu. Do you need to remove an object, widen the canvas, isolate a subject, replace a sky, or add a new element? Each task has a better-suited tool. Adobe Firefly powers Photoshop’s generative features, and a model picker may also provide access to partner AI models. The available model can affect the appearance of the result.
| Goal | Best Photoshop AI tool | Where to look | Main limitation |
|---|---|---|---|
| Remove a passer-by, cable, or small distraction | Remove Tool or Generative Remove | Healing-tool area or contextual controls | Complex textures may need a second pass |
| Add room around a crop | Generative Expand | Crop tool and Contextual Task Bar | New edges can mismatch perspective or lighting |
| Add, replace, or alter a selected area | Generative Fill | Edit menu or Contextual Task Bar | Results depend heavily on a clean selection |
| Separate a person or product from its setting | Select Subject or Select Object | Select menu or toolbar | Fine hair and transparent details need review |
| Change an outdoor sky | Sky Replacement | Edit menu | Foreground lighting may still need adjustment |
| Create a product scene after cutout | Generate Background | After background removal | Shadows and reflections require inspection |
For beginners, start with Select Subject, the Remove Tool, and Generative Expand. Their results are easy to assess: the subject should be isolated, the distraction should disappear, or the frame should gain useful space. Generative Fill becomes more effective once you are comfortable creating accurate selections.
Use Generative Fill to change one defined part of an image
Generative Fill is the main Photoshop feature for targeted generative editing. It works inside a selected area and can follow a text prompt or infer the replacement from surrounding pixels when the prompt is blank. The process is non-destructive, so you can test different options without permanently painting over the original photograph.
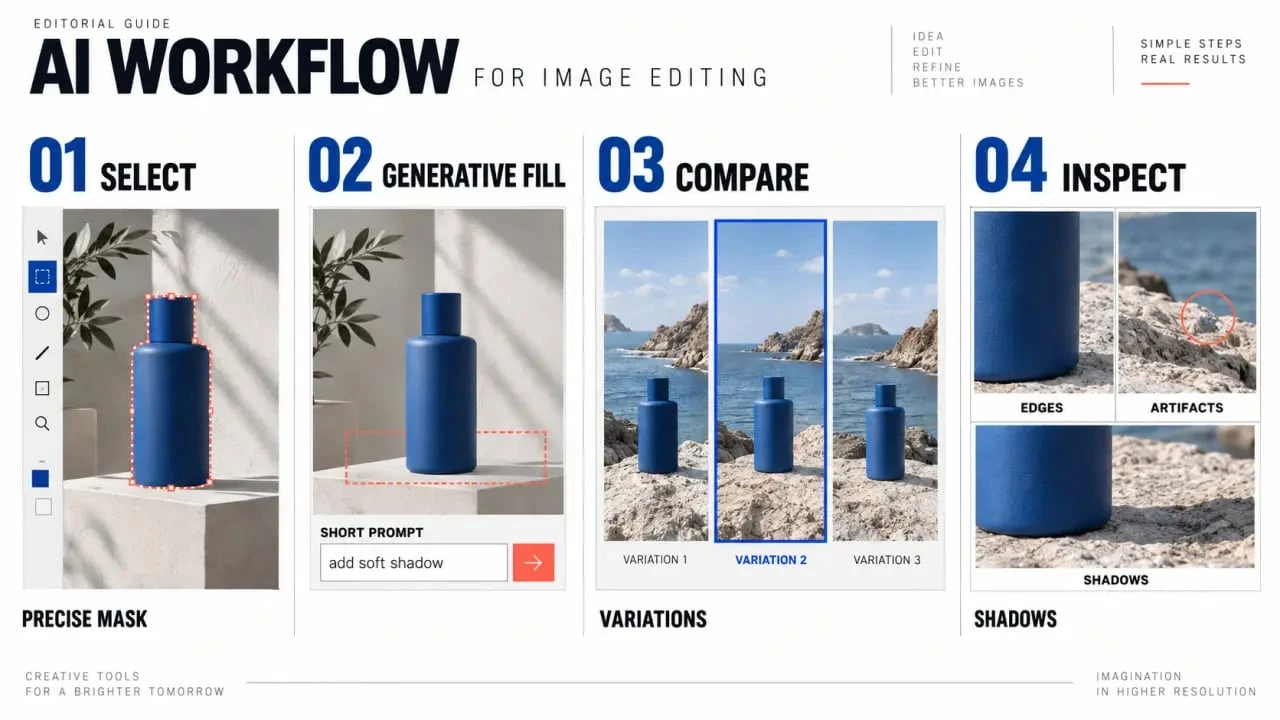
A dependable Generative Fill workflow
- Open the image and select the area to change with a selection tool, Selection Brush, or Object Select tool.
- Refine the selection so its edge includes only the area that should be replaced, added, or removed.
- Choose Generative Fill from the Contextual Task Bar or the available Edit controls.
- Enter a concise prompt for a deliberate addition, such as “small ceramic vase on a wooden table,” or leave the prompt blank for a context-aware fill.
- Select Generate, review the variations, and keep the option that best matches the scene.
A useful prompt describes the object, material, viewpoint, and relationship to the scene. “Matte black floor lamp, side view, soft window light” gives the generator more practical direction than “beautiful modern lamp.” If the object is placed correctly but one detail looks wrong, revise that detail instead of rewriting the entire prompt.
Why selection edges matter more than clever wording
The selection defines what remains protected while Photoshop changes the surrounding area. A loose selection can let generated pixels spill into a face, product edge, or horizon. An overly tight selection can leave a visible seam. When removing an object, include a small amount of nearby texture, then inspect the transition at high magnification. This boundary check often improves realism more than adding extra words to the prompt.
Extend, remove, and replace without using the same tool for everything
Generative Expand is for composition, not just bigger dimensions
Use Generative Expand when a photo has the wrong aspect ratio or feels cramped. Select the Crop tool, pull the crop boundary beyond the original image, then choose the generative expansion action in the Contextual Task Bar. Photoshop creates new content in the empty canvas area, such as more sky above a portrait, more sand around a subject, or extra scenery for a horizontal banner.
Judge the expanded image as a composition, not just as a larger file. Check horizon lines, repeated patterns, perspective, and the direction of light. A successful expansion gives the original subject room to breathe. A poor one may fill the canvas while introducing distracting details. If the new area looks unconvincing, try a smaller extension or generate another variation.
Remove Tool, Generative Remove, and Sky Replacement
For a small unwanted element, brush over it with the Remove Tool in the healing-tool area. The tool can remove distractions without requiring a comparable sample area, which makes it practical for power lines, photobombers, or a stray object on clothing. Generative Remove is useful when Photoshop needs to reconstruct a more complicated area behind the object.
Sky Replacement is more specialized. Open it from the Edit menu, choose a replacement sky, and use controls such as brightness and temperature to integrate it with the foreground. It is often faster than masking a sky manually, but it cannot make every reflection, shadow, and color cast believable automatically. Treat it as a starting point, then review the entire scene for consistent lighting.
Create images and backgrounds when a photograph is not enough
Photoshop can generate an image from a text prompt, with options for styles and reference images. Start a project, choose the available Generate image action, write a clear prompt, optionally add a reference image or style direction, and generate variations. Review the alternatives before choosing the direction that needs further editing.
This workflow suits concept art, social assets, rough visual exploration, or source material for a larger composition. A reference image can guide color, mood, or framing, while the text prompt specifies what should be new. Use the generated output within a layered Photoshop workflow: crop it, mask it, adjust its color, and match it to the project instead of expecting one generation to resolve every design decision.
For e-commerce imagery, first remove the original background around the product, then use Generate Background. Describe the setting through its surface, light, and camera angle, such as a pale stone surface with soft side light. Inspect contact shadows, reflections, and the product outline. These details determine whether the product appears grounded or pasted into a synthetic scene.
Keep results credible with a short review routine
AI output varies with the source image, selection boundaries, prompt, chosen model, and intended edit. Rejecting several variations is normal. The goal is to choose the option that still looks convincing beside the original image and at the final delivery size, not simply the first result that seems plausible.
- Check hands, faces, lettering, repeated objects, and fine patterns for visual artifacts.
- Compare the direction and softness of generated shadows with the existing scene.
- Zoom in on masks, hair, product edges, and horizon lines.
- Keep generated work on separate layers where the feature supports it, so revisions remain possible.
- Use Neural Filters selectively for colorization, portrait softening, makeup transfer, or Super Zoom, then assess whether the effect still looks natural.
Photoshop AI features can be available on desktop, web, and phone, although the interface and feature set may differ. You may need to accept Adobe AI terms of service before using generative functions. If a command is missing, check the Photoshop version, platform, account access, and current contextual controls before assuming the tool has failed.
The most reliable workflow combines AI speed with human judgment. Select carefully, generate several options, correct visible problems, and preserve an editable path back to the original. With that approach, Photoshop AI tools become practical editing assistants rather than shortcuts that require blind acceptance.